Back to Energy Manager Main Menu
Savings actions
The Savings Actions feature in Energy Manager is a way to track energy conservation projects. The Savings Actions feature can be accessed from the main menu. *Note: If you do not currently have access to the Savings Actions feature, please contact your Sales Representative or Client Services for more information.
Walk-throughs
Walk-throughs are a place to document assessments for your facility.
How to add a walk-through
- Click the Savings Actions main menu option, then select Walk-Throughs.
- Enter a Walk-Through Title and a Description.
- Select the Date the walk-through occurred, as well as the Start Time and End Time.
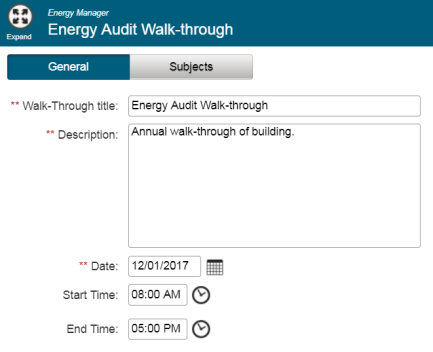
- Click Save.
- After saving, click on the Subjects tab, then click on the Add Subject button.
- Enter a Subject Name, and a Description.
- Click Save.
- After saving, you will have the option to add attachments to this Walk-Through Subject by clicking on the Docs & Photos tab.
Capital projects
Track your capital projects for energy conservation, such as replacing lighting with energy saving bulbs, or replacing HVAC units. Capital Projects may come about as a result of the Walk-Throughs.
How to add a capital project
- Click the Savings Actions main menu option, then select Capital Projects.
- Click Add Project.
- Enter a Project name, and a Description.
- Enter a Project mgr, Master project, and any applicable date information.
- Click Save.
- After saving, click on the Measures tab, then click on Add Measure. Measures are the action items that are taken to help conserve energy at your facilities.
- Enter a Measure name, and a Description.
- Select a Facility from the drop down menu.
- Choose a Measure type, and subtype if needed, from the drop down menus.
- Enter any other information as applicable, and click Save.
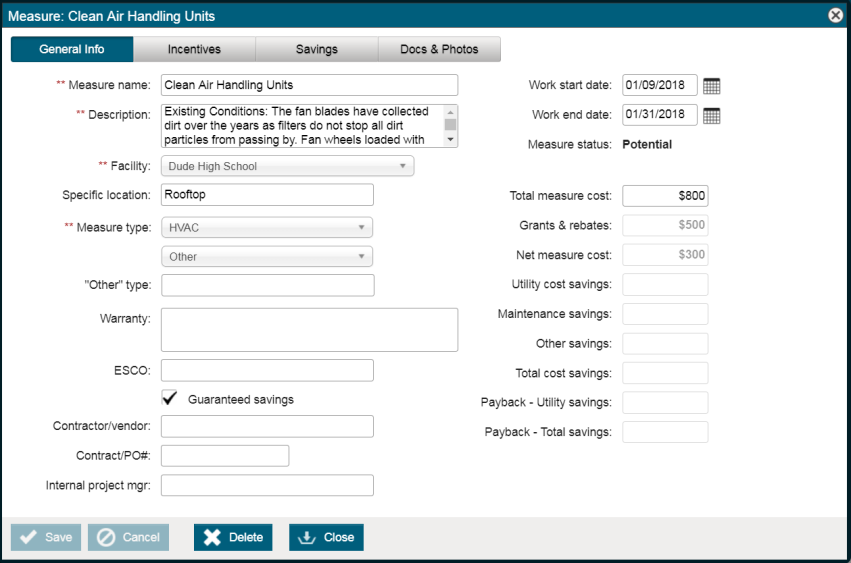
- After saving, click on the Incentives tab. This is where you can track any incentive savings you are receiving for this measure.
- For each "Grant" or "Rebate", enter the Amount, a Description, a Provider, and the Status of the incentive. A Total will be calculated for the Grants and the Rebates, as well as a Grand Total at the bottom of the window.
- Click Save, then click on the Savings tab.
- Click on Add Service.
- Select a Service type from the drop down menu. The Meter type and Meter unit will update accordingly.
- Select a Savings start date and Savings end date, and enter any applicable Account & meter details.
- Enter the Annual savings amount in Use and Cost.
- Click the Prorate button to adjust savings percentage per month.
- Click Save. If needed, you can add a photo or document to the measure by clicking on that tab.
- Click Close after you are finished entering all Measure information. If you would like to add a photo or document related to the entire capital project, click on the Docs & Photos tab.
O&M activities
Keep track of your O&M, or Operation & Management, activities including who’s working on the project, time spent, and annual cost savings.
Trying to submit an O&M Activity as a work request? Check out our integration with Asset Essentials!
How to add an O&M activity
- Click the Savings Actions main menu option, then select O&M Activities.
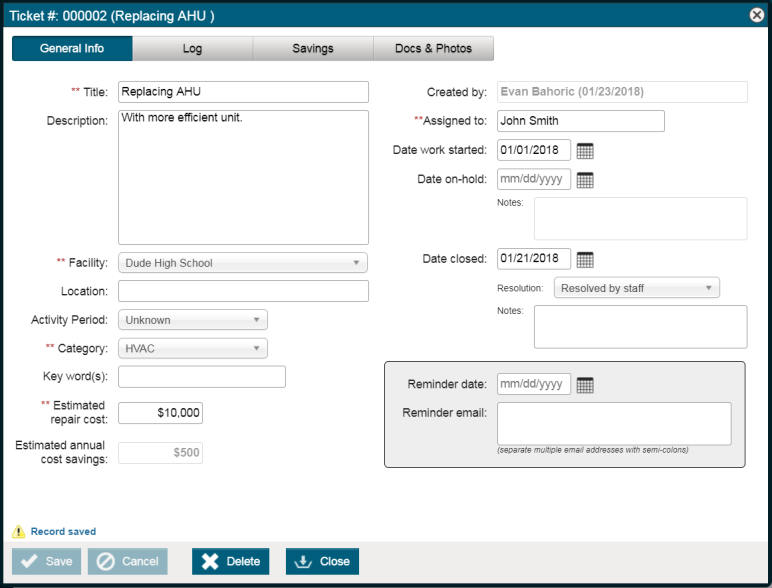
- Click Add Activity.
- Enter a Title to describe this activity.
- Select the Facility where this activity will occur, and a more specific Location if needed.
- In the Activity Period drop down, choose the appropriate occupation status of the facility when the work should occur.
- Choose a Category.
- Enter the Estimated repair cost.
- Enter the person who will be performing this work in Assigned to.
- Click Save.
- When the project has started, enter a Date work started. If this date is not yet filled in, or is a date in the future, the status of the Activity will be Potential on the O&M Activities list. Once the project has started and that date is filled in, the status will change to In-Process.
- If the work needs to be put on hold for any reason, enter the Date on-hold and the status will change accordingly.
- When the project is completed, enter the Date closed and choose a Resolution from the drop down menu. The status of the Activity will update to Closed.
- After saving, click on the Log tab to add notes about this Activity. The note will record the date and time, as well as the user entering the note.
- Click on the Savings tab to enter an Estimated annual cost savings which will appear on the General Info tab of the Activity. Add any necessary notes, and check off the Services this will impact. The services checked off here will also act as a filter when searching for the Activity.
- If you would like to add a document or photo related to the Activity, click on the Docs & Photos tab.
Checklists
Checklists are a way to create a tasks and procedures list to carry out best practices for saving energy. The Checklist Setup menu option is where you create the checklists, and the Checklists menu option is where the checklists are completed.
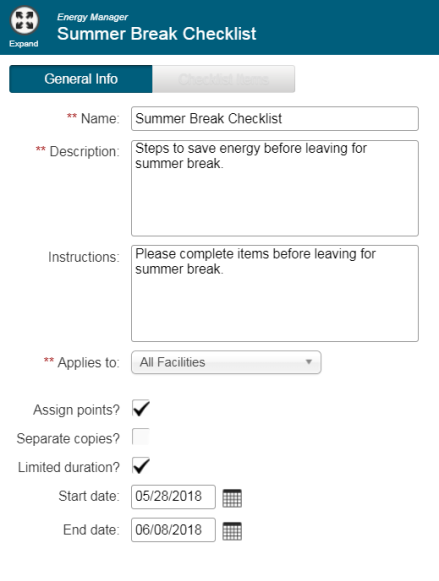
Checklist setup
- Click the Savings Actions main menu option, then select Checklist Setup.
- Click Add Checklist.
- Enter a Name for the checklist, as well as a Description.
- Choose whether this checklist Applies to all facilities, selected facilities, or a single facility.
- Check the Assign points? box to allow each checklist item to have a point value.
- If applicable, check the Separate Copies box.
- Check the Limited duration? box to allow a certain time frame for the checklist to be completed, then select the Start date and End date for the checklist.
- Click Save.
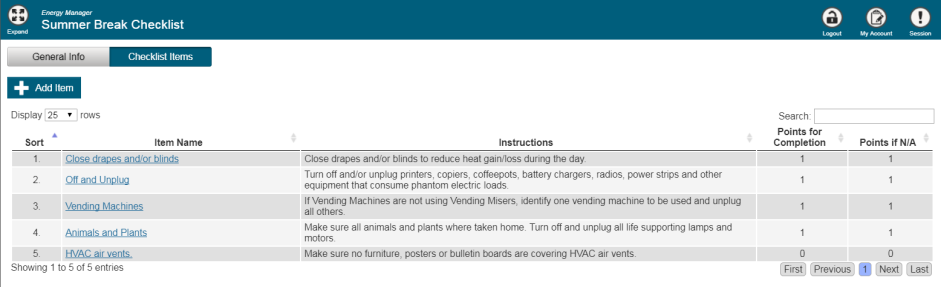
- After saving, click on the Checklist Items tab.
- Click Add Item.
- The Sort priority number will automatically fill in for you, but can be edited if you would like to adjust the order of the items.
- Enter the Item name and Instructions.
- Click Save. Repeat this process for any items you want to add to the checklist..
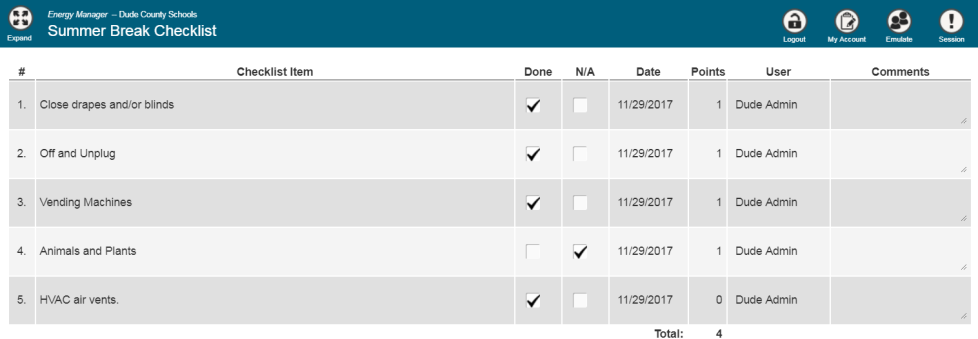
Checklists
- Click the Savings Actions main menu option, then select Checklists.
- Any checklists you have created will show here, associated with whichever facilities were selected in Checklist Setup. Use the drop down menu to select the facility you need to complete a checklist for, then click on the appropriate checklist. *Note: If you have a set time frame for this checklist, it will show as Inactive, but you can still view the checklist if you click on it.
- To complete an active checklist, check the Done or N/A boxes for each item, then click Save to record your responses.